Much the same way you require a record of the cellphone numbers of your friends to put a call through to them any time you wish to speak with them, a DNS (Domain Name System) server can be best regarded as a phone book containing every public IP address as well as domain name, related to each other. The server functions as an internet directory, which is employed for turning alphanumeric domain names into corresponding IP addresses.


Many reasons abound that could make you want to use a third-party DNS server, like parental controls, speed security features, reliability improvements, and to achieve some other objectives. Changing the DNS server for your entire home network can be done on your router, or you can decide to set it individually on your laptop, desktop, Mac, iPhone, iPad, Android phone, Chromebook, or several other devices. In this write-up, we will elucidate how to change the DNS server of your Android and iOS smartphones and tabs.
How Does a DNS Server Work?
It functions by mapping a domain name to the IP (Internet Protocol) address of the server in which the site is hosted. Once your smartphone has got the appropriate IP address, it is then able to access that site, along with all the content on it.
Your Internet Service Provider (ISP), by default, dictates automatically the preferred and alternate DNS server that you make use of. The majority of people do not even spare any thoughts about it. We merely expect our internet to work immediately we top our data. Every web page you load will possess its own IP address, in addition to other content like images, iframes, as well as ads, got from other IP addresses. The important thing you need to take note of here is this: All these will work to make your browsing experience slow.
Changing DNS Server on Your Phone
Android
With Android OS, you can change a DNS server, but not system-wide. All individual Wi-FI networks to which you connect come with their own settings. If you would like to utilize the same DNS server in all places, you will need to change it for each Wi-Fi network to which you connect.
Android operating system requires a static IP address to make use of custom DNS addresses that need additional setup procedures. The router approach is can be used in this case. If you set IP Settings to “Static”, it’ll have an impact on the way the Dynamic Host Configuration Protocol (DHCP) carries out address allocation and can only be employed as a short-term solution. You must configure your router and also assign static Internet protocol to the MAC address of your phone in order to function, correctly.
If you change the DNS settings, it’ll only have effects on your existing Wi-Fi network connection. No option is available for changing the DNS settings for those 3G or 4G data networks connection you use. And as said earlier, you have to change the DNS server settings for every one of the Wi-Fi networks you intend connecting to.
Steps for Changing the DNS Settings on Your Android
Let’s now walk you through the (straightforward) procedure for changing your Android phone DNS settings:
Head to Settings on your smartphone
Hit “Wi-Fi”
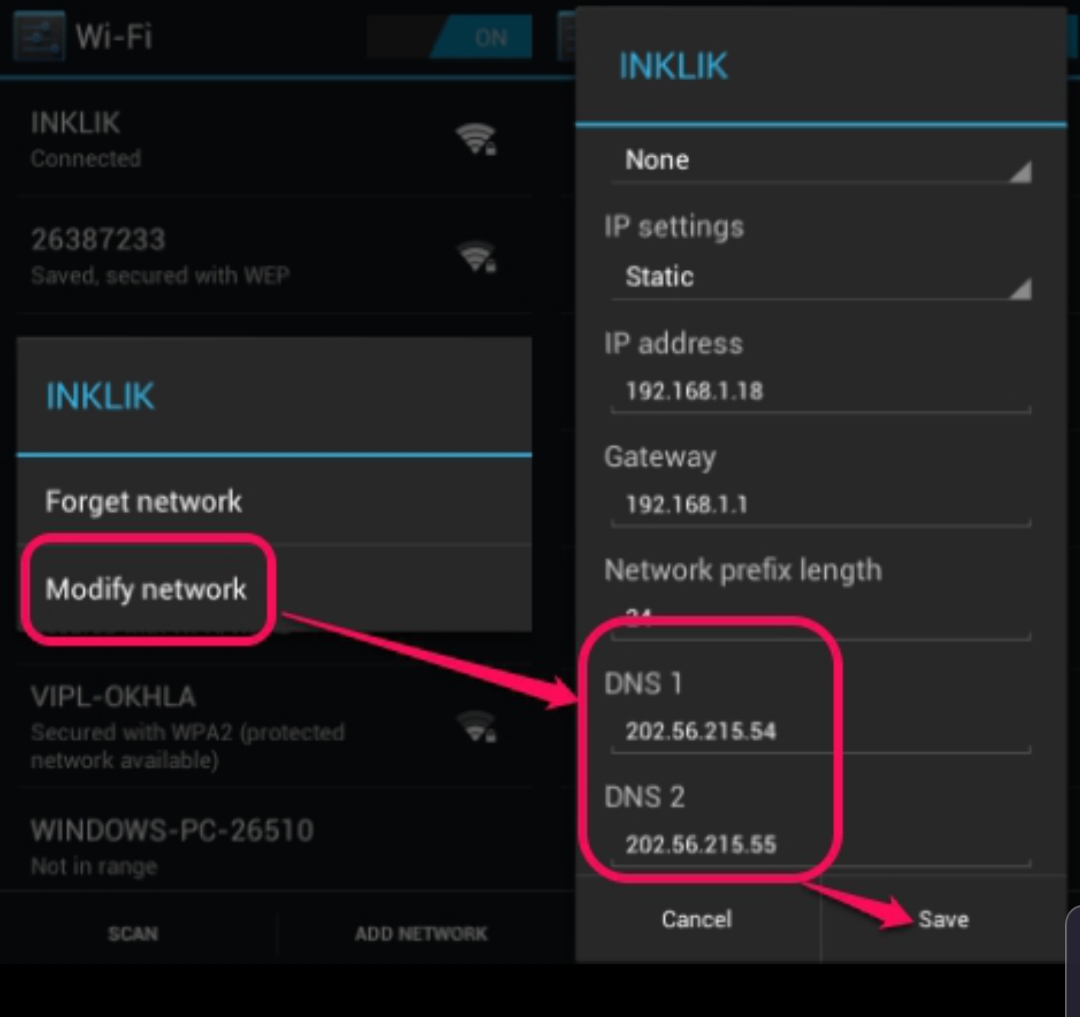
Long press the present network you use and tap on “Modify network”
Tick the checkbox, “Show advanced options”
Choose “IP settings,” instead of “Static”
Add the IPs of the DNS servers to the “DNS 1” as well as “DNS 2” fields
Tap the “Save” option
Lastly, disconnect from the network and now connect again for the changes you made to take effect
iOS
With Apple iOS, you can change your device DNS server, but cannot set a preferred DNS server system-wide. Normally, your iPhone or iPad makes use of the DNS servers that come with the Wi-Fi networks that you use. You are only allowed to change the DNS server of an individual Wi-Fi network to your custom setting; thus, you must do this for each Wi-Fi network that you are connected to.
Steps for Changing the DNS Settings on Your iPhone or iPad
To change the DNS settings on your iOS (iPhone, iPad, and the likes), follow the process highlighted below:
Go to Settings on your phone
Select “Wi-Fi”.
Put it on if it is turned off
Select a Wi-Fi network and hit the blue “i” icon
Press the text-field that is across the DNS label
Input the DNS addresses
Hit “Wi-Fi” that is on top to go back
And your changes will be saved, automatically
What Are the Free DNS Servers to Choose from?
Here are some DNS servers you can use for free:
DNS servers will provide you with a range of benefits, including faster internet access by reducing latency, filtering malicious or adult content, and stronger security with encrypted browsing history.


